
Allow access to your screenshots in Scrabboard Solver
Scrabboard Solver ·
Authorize your screenshot folder to enable “Solution (last image)”. Once a usable image is detected, one tap launches the process leading to the best solution, without searching for your screenshot in the gallery.
Why authorize a folder?
Launch the solution in one tap
Take a screenshot of your board, then open Scrabboard Solver. Once it is detected, tap “Solution (last image)” to start recognizing and solving it.
Find your latest image
The preview lets you check the proposed image. The app picks the most recent image across authorized folders, using the modification date supplied by Android.
Choose the folders you need
Authorize the exact screenshot folder and add others if needed. You can remove each folder’s access and enable deletion after use separately.
Authorize your folder in six steps
-
In Gallery or Photos: open a recent screenshot
Open Gallery or Photos on your phone and view a screenshot of the board you want to analyze. Use it to find its folder and then check your setup.
-
In the gallery: open image details
Open the ⋮ or … menu and choose “Details” or “Info”. The command’s name and position depend on your gallery.
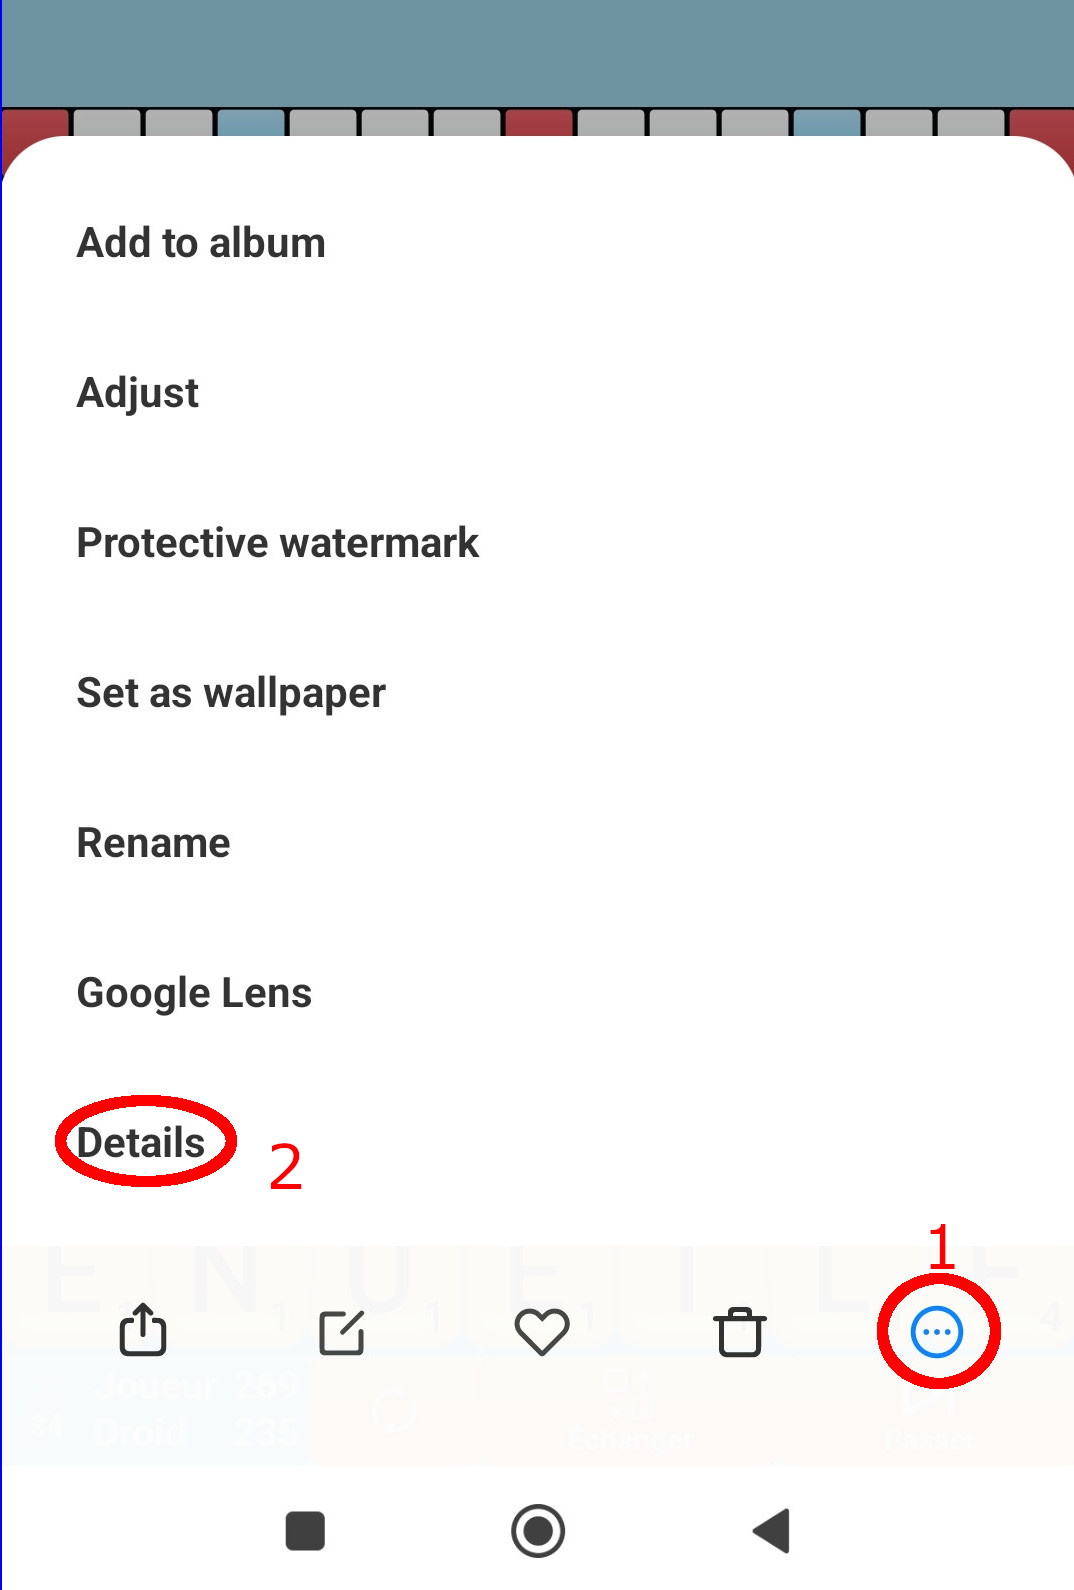
In the gallery, open the three-dot menu and choose Details. -
In the details: find the exact folder
Look for “Local path” or “Location”. Note the path of the containing folder: the name ending in .jpg or .png is the image file, not the folder to authorize.
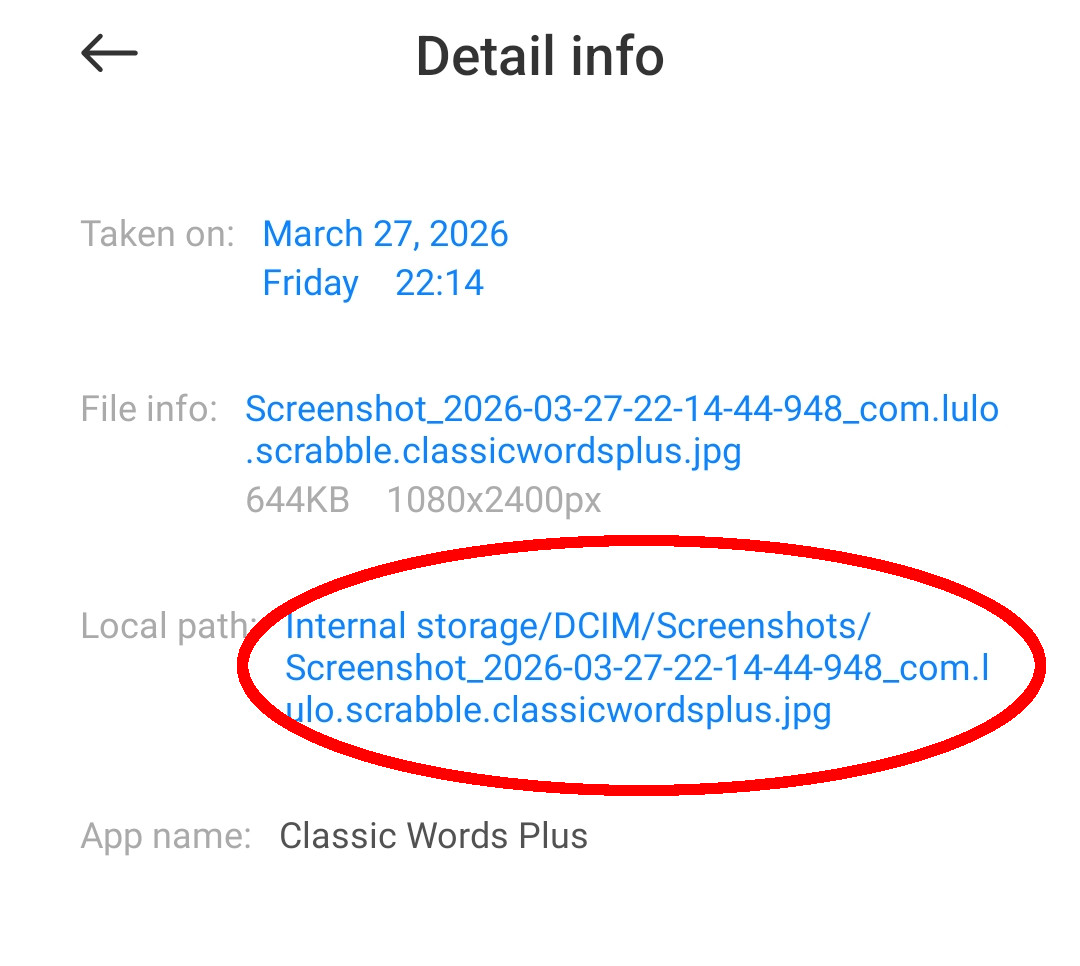
The local path of this screenshot identifies the Internal storage/DCIM/Screenshots folder. - Example image path
Internal storage/DCIM/Screenshots/Screenshot_example.jpg- Folder to authorize
Internal storage/DCIM/Screenshots
Pictures/Screenshots and DCIM/Screenshots are common screenshot locations; DCIM/Camera often holds camera photos. These are examples: always follow your image’s actual path. Authorize the folder directly containing the files, rather than a parent folder.
-
In Scrabboard Solver: request access
Return to the app. Open “Settings → Photo access” and tap “Authorize a folder”. Read the warning about large folders, then tap “Continue” to open the Android folder picker.
-
In the Android picker: confirm the folder
Check the suggested folder against the path you found. If it differs, navigate into the correct folder. Tap “Use this folder”, or the equivalent Android button, and confirm any access request. Wait for validation without pressing Back.
Confirm the folder, not an image: viewing or selecting a photo does not replace tapping “Use this folder”.
-
In Scrabboard Solver: check and launch the solution
Wait for the “Success” dialog with “Access granted!”. Check the folder under “Authorized folders”. Return to the main menu, let the search finish and check the preview. Once your screenshot is detected, tap “Solution (last image)”: processing leads to the best solution. Repeat the procedure to add another folder.
This shortcut is recommended for screenshots of Scrabble apps. The letters on your rack tiles are recognised automatically when the tiles are visible anywhere below the board in the image. Processing takes time and may require confirmation. You can correct a misread rack manually; blank tiles are not supported by rack recognition.
Setting up folder access: video guide
The illustrations and video are in English. The written tutorial covers every step, so you can follow it without watching the video.
Optional: delete the image after use
Enable this option separately. Authorizing a folder does not launch the solver or enable deletion.
- Authorize the folder containing the image.
- Open “Settings → Preferences”.
- Enable “Delete image after usage”.
This deletes the original image after processing through the “last image” workflow. It does not apply to images selected manually from the gallery. Android may request confirmation, and deletion can fail. The option cannot be enabled without an authorized folder; removing all folders disables it.
Troubleshooting and common questions
I cannot find my screenshots, or the suggested folder is wrong.
Open a screenshot in Gallery or Photos and view Details or Info. Follow its Local path or Location in the Android picker. The default folder is only a starting point.
I can see the images, but access is not confirmed.
Enter their folder and tap “Use this folder”. Selecting an individual image does not authorize access to its folder.
The button says “Permissions (Required)” or “No Image (Empty Folder)”.
In “Settings → Photo access”, check that the exact folder is authorized and contains a usable image. If access has been revoked, authorize it again. Return to the main menu and wait for detection to use “Solution (last image)”.
Why does the app suggest another photo?
It selects the most recent image across all authorized folders without checking whether it shows a board. A newer photo in Camera can replace your screenshot. Remove unneeded folders or select the correct image manually from the gallery.
What if the image is over a week old?
A warning lets you continue or cancel. Check that you have taken a recent screenshot and authorized the right folder.
Why is authorization or searching slow?
Large folders, especially Camera, can take longer. Wait without pressing Back during validation. Start with your screenshot folder and add Camera only if you also use its photos.
Can I authorize multiple folders?
Yes. Repeat “Authorize a folder” for each folder you need. The app compares the latest images in those folders.
How do I remove folder access?
In “Settings → Photo access”, tap the trash icon beside the folder under “Authorized folders”. This removes access without deleting the folder’s images.
Can I still pick an image from the gallery?
Yes, manual selection remains available without configuring folders. Authorization is used for the “last image” shortcut and its associated deletion option.
Why is an image picked from the gallery not deleted?
“Delete image after usage” does not apply to manual selection. Use “Solution (last image)” with an authorized folder and enable the option in “Settings → Preferences”.
Need help?
If you still cannot set up access, contact us: scrabboardsolver@gmail.com
Start by authorizing only your screenshot folder: it makes it easier to find the right image in the direct solution menu.
Free to download.